
Renee Krohn is back to showcase another eco-friendly project. Today, we are learning to make our own Magazine Trivet!
Upcycle Magazines into Trivets
If you have kids or have ever bought just about anything online, then you have probably gotten catalogs. I have the trifecta in my home. Kids catalogs, my catalogs, and catalogs from people who bought us lovely things as gifts. I never knew there was a fruit basket catalog or an option for a fruit of the month gift set. I also managed to get some catalogs that I have no idea how I got on their mailing lists.
Many recycling services will not take the glossy paper that magazines and catalogs are printed on. So now what do I do with this mountain of paper that is starting to look like my home should be on an episode on hoarding? There must be something I can make out of all this paper.
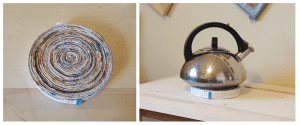
The idea hit me when I was having my morning tea. I normally am in my studio working and always keep running back downstairs to get more hot water for my tea. Wouldn’t it be nice to be able to have my kettle upstairs in my studio? I can’t mess up the workstations with a hot metal kettle. A trivet would solve that problem.
How to make it thick enough for the heat and sturdy enough for some weight. Folding or rolling the magazines would not be strong enough so I decided to combine the two – fold AND roll.
Supplies Needed
All you need to make this trivet is 1-2 catalogs, scissors, a pencil, and a bit of school glue.
How to Make a Magazine Trivet
The FOLD

First, take your catalogs apart by taking out the staples, holding the pages and cutting the pages along the center fold.

Then fold the pages lengthwise and cut along that fold – basically cut the pages in half.
Depending on how big your pages are, fold your half sections into either 3 or 4 sections until you get a strip about an inch thick. You will want to make all of these before you start rolling.

The ROLL
To start your roll off, it is way easier to use a pencil, dowel, or a new round chopstick that came with the takeout last week (what I used). You just want to use something round with a small diameter. You want to reach that oh so delicate balance of wrapping tightly but not so tight that you tear the paper.

When you have about an inch tail left on the strip on your roll, add a second strip by sliding it in between the piece you are rolling. You can add a dab of school glue on to help hold the two pieces together. Remember to keep your rolling tight. If you do tear a piece, no biggie. Just slide the torn off end back into the other end, add a dab of glue and keep going. When your roll gets to about an inch in diameter, you should be able to slide it off the pencil.

Keep rolling and adding new pieces until your trivet is as wide as you need it. Mine was a little over 6 inches to fit under my kettle, but I have also made 10-inch ones for casserole dishes. As you are rolling, if you find your strips are slipping, you can run a thin bead of school glue along the long strips as you roll. Remember not to use too much glue. To finish off your trivet, glue the end flaps down as smoothly as you can. Put a rubber band around the glued piece and let dry overnight.
NOTE – DO NOT PLACE POTS/PANS ON TRIVET RIGHT OFF THE STOVE. The heat they retain may burn the paper. I have not had it happen, but I must put the warning out there.
Upcycle mini lesson and coaster created by RenKroDesigns
Check out more Eco-friendly artwork and ideas on Facebook @RenKroDesigns or Instagram @RenKroDesigns
